Three Part Blog Series-On water damage/texture & painting repair caused by frost or ice dams
If you have good insulation and good ventilation you won’t get frost damage or ice dams. Water damage is a serious issue that can cause thousands of dollars’ worth of damage.
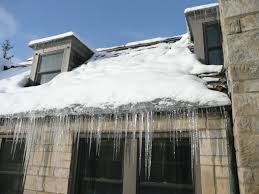
If you do see a stain on your ceiling, usually it’s a dark spot or grayer spot when it’s wet. When dry it’s that sickly dirty orange-yellow color and it may have some dark streaks mixed in. You will need to solve the immediate problem. If you remove the snow and ice from your roof you will have solved the short term problem. If you decide to do this yourself, be careful! Ice and snow on a steep roof with a long drop to the ground..do the math! In addition to the dangers involved you can cause long term damage to your roof using a pickax and/or shovels. The simple solution is to remove the snow and then use salt and lots of it. Salt pucks or salt in a nylon sock or pantyhose seem to work well. In some cases you will not need to climb onto the roof, this will allow the water to drain safely. You can go online and find some of these products or you can hire a professional to steam or hot water blast away your ice dams.
Ok, so now the problem won’t continue. The snow and ice are gone, but what about that ugly stain on your bright white ceiling? When you first notice the stain watch it like a hawk. The first question would be is the stain growing or getting larger? If it is not growing then it’s not an immediate problem. The stain can be as big as a dime and up to the size of a trash can lid without being a serious problem. The more serious problems happen when the stain starts to change in shape. Is the texture starting to droop, sag, fall off or crack etc.? Is water starting to drip or run off the ceiling? If so, it’s time to take more extreme action. Water is building up above the ceiling and if you don’t eliminate that excess water it will move into other areas of your home. You will need to drain away the excess water! Get a couple of buckets, a ladder or stool and take action. Find the nastiest looking spot and drive a screwdriver into the sheetrock or any hard pointy object will work. You may need a hammer to break through the sheetrock ceiling. Water will start to drip out of the hole you just made. Capture the water into the bucket. More holes are sometimes needed to remove the water. More holes will also allow the ceiling to dry out thus eliminating the potential for mold. The faster the ceiling dries out the less chance for mold. Get some fans and heaters pointed at the problem right away to further aid the drying process. In extreme cases make a larger hole, as large as your fist may be necessary to eliminate the water and dry out the ceiling. Once the water is gone, the ceiling is dry and spring is here it’s time to repair the ceiling.
Check back soon for part two & three in our series on water damage/texture repair.